釀葡萄葉(Dolmades Nistisimi,Dereve Pattoug)
")
釀葡萄葉是一個充滿希臘風味的菜餚,適合成為開胃菜或便餐,結合了米飯、香草和多種配料,營養美味。
舊世界的干醃肉技術曾經被用於保存動物的各個部分,這些部分在變質之前無法食用。然而,今天已經完成了乾醃,因為這種技術可以生產出具有令人難以置信的風味和質地的絕對美味的肉類。如果您從未吃過經過乾燥固化和老化六個月的 guanciale,那麼您就沒有活過!脂肪在你嘴裡融化,就像某種超凡脫俗的美味豬肉糖!
幹固化需要大量的時間和耐心。它還需要一些專門的設備,以便您可以控制會影響產品質量和安全的環境變量。
幹醃室對於製作幹醃肉至關重要。
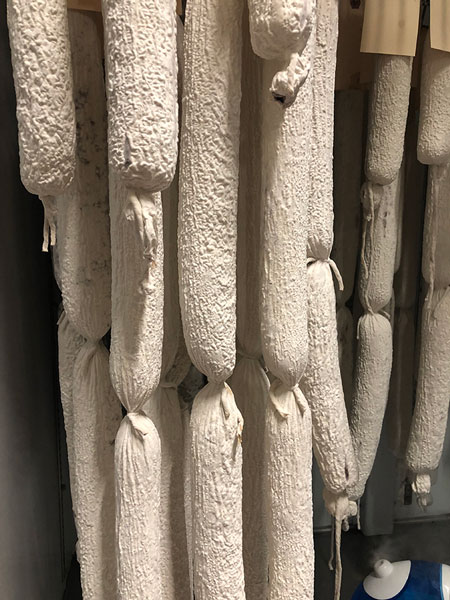
當我長大的時候,如果冰箱裡的奶酪上有黴菌,我爸爸會告訴我們把它切掉繼續吃。從某種意義上說,這看起來很噁心,但他是對的;奶酪上的黴菌只是在表面,去掉之後,奶酪就可以吃了。黴菌是一個環境變量,如果不加以管理,可能會成為真正的痛點。但並不是所有的黴菌都是壞的。您是否知道稱為青黴素的抗生素來自特定類型的黴菌?青黴菌家族的黴菌通常生長在幹醃肉和陳年奶酪上。事實上,意大利臘腸(見下圖)可以而且通常應該接種這些黴菌,以防止壞黴菌。
 馬克·拉菲
馬克·拉菲
意大利臘腸塗有白色青黴菌黴菌。
作為一般規則,塵土飛揚且不浮腫或模糊的白色黴菌被認為是安全的。任何其他顏色的黴菌都是壞消息,一旦發現應立即用蒸餾醋清除。當您處理肉類時,您會遇到黴菌。不過別擔心;有幾種方法可以保護自己免受黴菌侵害:
如果您不確定肉製品上的黴菌,請用醋和一次性毛巾將其清除。
在處理肉類之前,請洗手、清潔和消毒工作區域,並戴上一次性食品處理手套。
乾肉會減少蛋白質組織中的水分。這樣做是為了保護或延長蛋白質的壽命。所有細菌都需要水才能生存和繁殖。去除水是消除這些細菌所必需的,這些細菌會破壞您的產品並使您生病。您也可以通過醃製來控制含水量。本書中乾醃肉的食譜和程序使用鹽和乾燥的組合來控制水分活度。
幹固化時,控制溫度和濕度至關重要。你的烘乾溫度應該在 50 到 55 華氏度之間;不要偏離這一點。您的環境也應該干燥,但不要太乾燥。如果您的環境太乾燥,您的產品會乾燥得太快,導致外部硬化並減緩內部乾燥。如果您的環境太潮濕,您的產品將需要很長時間才能乾燥,或者根本不會乾燥。在 70% 到 75% 的相對濕度下乾燥是一個理想的範圍。
幹固化室內置所有這些控件並自動管理。如果您不使用乾固化室,那麼您可以使用小型數字比重計(濕度計)監控濕度,並使用數字溫度計監控溫度,兩者都可以在 Amazon.com 上購買。
可以通過使用以下公式計算重量損失百分比來近似水活度:
1 –(成品重量/起始重量)=重量損失百分比
作為一般規則,您希望在乾燥過程中至少減少 30% 的重量。肉失去的重量越多,最終產品變得越硬。像 guanciale 這樣的脂肪產品可能不會減掉 30%,因為脂肪中的可用水分較少。
每個食譜都將提供目標重量減輕百分比。但是,如果您仍然擔心乾燥程度,您可以使用活動計計算您的水分活度。水活度 ( aw ) 為 0.85 或更低時,不支持致病細菌生長,因此為了安全起見,這是一個理想的最小值。
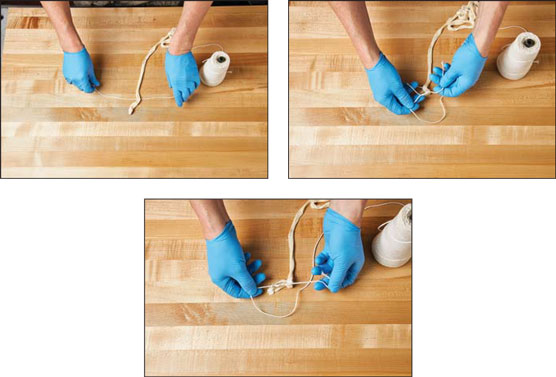
我會想像水手們是最好的熟食師,因為他們知道如何打很多結。您的肉將掛在幹醃室中,這樣它們在乾燥過程中不會與任何產品或表面接觸。這是為了確保適當的干燥氣流並減少干燥過程中的潛在變質。有幾種不同的方法可以捆綁您的產品,以便它們可以懸掛,在某些情況下,可以形成切口,以便在乾燥時呈現特定的形狀。在接下來的幾節中,您需要了解的唯一一個結類似於方結。請按照以下步驟操作(您也可以參考下圖):
繪製繩子,使其位於 coppa 下方。
將琴弦放在 coppa 的兩側。
將字符串越過自身以形成“x”。
將一端在另一端纏繞三遍。
小心地拉動繩子的每一端以收緊繩子。
最後一次,將繩子的末端放在一起形成一個“x”。
將一端纏繞在另一側一次,然後將其拉緊以完成打結。
 大衛·普盧默的照片
打結步驟。
這個結對於製作熟食非常有用,因為當你係上它時它不會滑落。還有其他幾種方法可以捆綁您的產品。
當您製作幹醃肉時,從開始到完成需要很多時間。通過記錄所有內容,確保您不會忘記任何關鍵細節。一種行之有效的方法是使用小吊牌。以下是您應該在產品吊牌上記錄的內容的列表:
將吊牌放在用於將產品懸掛在乾燥固化室中的掛鉤或繩子上。這將使您的生活更輕鬆,因為您全年都在檢查您的熟食肉類!
準備時間:30分鐘
治愈時間:14天
乾燥時間:約 60-120 天
目標減重:35%
原料
(3%) 海鹽
(.25%) 粉紅色鹽 #1
(.5%) 粗磨杜松子
(.5%) 紅辣椒片
(.5%) 粗磨香菜
(.25%) 幹迷迭香
(1%) 壓碎的新鮮蒜瓣
(.13%) 碎月桂葉
五花肉,去皮
1個食品安全塑料袋
Weigh your pork belly and convert the weight into grams.
Calculate the ingredient weights by multiplying the weight of the pork belly by the percent provided for each ingredient.
Combine the ingredients in a mixing bowl.
Place the pork belly in a food-safe plastic bag, protein side up.
Apply approximately 50 percent of the seasoning mixture to the protein side and rub it into the tissue, being sure to cover the entire surface.
Leave the pork belly in the bag, and flip it over so that it is fat side up.
Apply the remaining seasoning mixture to the fat side, being sure to cover the entire surface.
Wrap the pork belly in the bag, being sure to remove as much as air as possible.
Lay the pork belly flat in your refrigerator and leave it to cure for 14 days.
Remove the pork belly from the refrigerator and run a meat “S” hook through one corner of the pork belly.
Hang the pork belly in your dry-curing chamber to dry at a temperature between 50 and 60 degrees Fahrenheit, and a humidity between 60 and 65 percent.
After 60 days, remove the hanging pork belly from the dry-curing chamber. Weigh it and calculate the weight loss percent using the formula provided earlier in the section, “Drying to preserve.” If the target weight loss hasn’t been reached, let the pancetta continue drying in the dry-curing chamber. Check again in two weeks.
Once the pancetta has reached the target weight loss, cut it into small chunks and vacuum pack each piece individually. I suggest you store them in the fridge, as this will ensure higher flavor quality much longer.
If you don’t have a dry-curing chamber, you can always try hanging the pancetta in a dark, cool spot in your basement.
Curing your pancetta in a vacuum-sealed bag will speed the process and reduce premature oxidation.
Prep Time: 30 minutes
Cure Time: 14 days
Dry Time: approximately 60–120 days
Target Weight Loss: 30 percent
Ingredients
(3%) sea salt
(.25%) pink salt #1
(1%) coarse ground black pepper
(.5%) coarse ground juniper berry
(.5%) red pepper flake
(.5%) coarse ground coriander
(1%) crushed fresh garlic clove
Pork jowl, skin off
1 food-safe plastic bag
Weigh your pork jowl and convert the weight into grams.
Calculate the ingredient weights by multiplying the weight of the pork jowl by the percentage provided for each ingredient.
Combine the ingredients in a mixing bowl.
Place the pork jowl in a food-safe plastic bag, protein side up.
Apply approximately 50 percent of the seasoning mixture to the protein side and rub it into the tissue, being sure to cover the entire surface.
Leave the pork jowl in the bag, and flip it so that it is fat side up.
Apply the remaining seasoning mixture to the fat side, being sure to cover the entire surface.
Wrap the pork jowl in the bag, being sure to remove as much as air as possible.
Lay the pork jowl flat in your refrigerator and leave it to cure for 14 days.
Remove the pork jowl from the refrigerator and run a meat “S” hook through the thin end of the pork jowl.
Hang the pork jowl in your dry-curing chamber to dry at a temperature between 50 and 60 degrees Fahrenheit and a humidity between 60 and 65 percent.
After 60 days, remove the hanging pork jowl from the dry-curing chamber. Weigh it and calculate the weight loss percent using the formula provided earlier in the section, “Drying to preserve.” If the target percent weight loss hasn’t been reached, let the guanciale continue drying in the dry-curing chamber. Check again in two weeks.
Once the guanciale has reached the target weight loss, vacuum pack it whole and store it in the fridge until you are ready to use it. If you don’t have a vacuum sealer, wrap it in plastic wrap and store it in a Ziploc bag.
If you don’t have a dry-curing chamber, you can always try hanging the guanciale in a dark, cool spot in your basement.
Curing your guanciale in a vacuum-sealed bag will speed the process and reduce premature oxidation.
Due to the fat content of pork jowls, the drying process can be much slower and you may not hit 30 percent weight loss. If after 90 days you have not reached 30 percent weight loss, the jowl may not loose any more. Take it down and give it a slice.
Prep Time: 30 minutes
Cure Time: 14 days
Dry Time: approximately 60–120 days
Target Weight Loss: 35 percent
(3%) sea salt
(.25%) pink salt #1
(.5%) coarse ground black pepper
(.25%) coarse ground juniper berry
(.25%) crumbled whole hop cones
(.4%) coarse ground coriander
(.125%) crumbled bay leaf
Pork coppa (also known as pork collar, or money muscle)
1 food-safe plastic bag
Weigh the pork and convert the weight into grams.
Calculate the ingredient weights by multiplying the weight of the pork by the percent provided for each ingredient.
Combine the ingredients in a mixing bowl.
Place the pork in a food-safe plastic bag; if you have a vacuum sealer, use a vacuum bag.
Evenly apply the seasoning mixture to each side of the pork.
With the pork in the bag, remove as much as air as possible, or vacuum seal it if you are using a vacuum bag.
Cure the pork in the refrigerator for 14 days.
Remove the cured pork from the refrigerator and tie it to compress and form the coppa. Tie it using the basic knot described earlier in the section, “Tying the knot.” Tie your first knot 1 inch from the end of the coppa. Then tie additional knots every inch. Make sure that you cinch the knots tight to compress the coppa. When you tie your last knot, do not trim the string; instead, tie it off to form a loop to hang it with.
Hang the coppa in your dry-curing chamber to dry at a temperature between 50 and 60 degrees Fahrenheit and a humidity between 60 and 65 percent.
After 30 days, remove the hanging coppa from the dry-curing chamber. Weigh it and calculate the weight loss percent using the formula provided earlier in the section, “Drying to preserve.” If the target percent weight loss hasn’t been reached, let the coppa continue drying in the dry-curing chamber. Check again in two weeks.
Once the coppa has reached the target weight loss, vacuum pack it whole and store it in the fridge for 30 to 60 days. This will allow any available moisture to even out and soften the outside of the coppa, which will likely have hardened during drying. If you don’t have a vacuum sealer, tightly wrap it in plastic wrap and store it in a Ziploc bag.
吃的時候把coppa切成薄片。不要切片儲存,因為它會氧化,嘗起來像平淡的豬肉。
如果您沒有乾燥固化室,您可以隨時嘗試將 coppa 掛在地下室陰涼的地方。
改變它!嘗試不同數量的不同香料以獲得不同的結果。
準備時間:30分鐘
治愈時間:14天
乾燥時間:約 60-120 天
目標減肥:35-40%
原料
(3%) 海鹽
(.25%) 粉紅色鹽 #1
(.5%) 粗磨黑胡椒
牛眼圓(修剪至不超過 3-4 英寸厚)
1個食品安全塑料袋
稱量牛肉並將重量轉換為克。
通過將牛肉的重量乘以每種成分提供的百分比來計算成分重量。
在攪拌碗中混合成分。
將牛肉放入食品安全塑料袋中;如果您有真空封口機,請使用真空袋。
將調味料均勻塗抹在牛肉的每一面。
把牛肉包在塑料袋裡,一定要盡量排除空氣;如果您有真空封口機,請使用真空袋。
將牛肉放入冰箱醃製 14 天。
從冰箱中取出醃製牛肉並將其綁起來壓縮並形成bresaola。使用前面“打結”部分中描述的基本結來打結。在距 bresaola 末端 1 英寸處打第一個結。然後每英寸打一個額外的結。確保您係緊結以壓縮 bresaola。打完最後一個結時,不要剪斷繩子;相反,把它繫起來形成一個環掛起來。
將 bresaola 掛在您的干燥固化室中,使其在華氏 50 度至 60 度之間的溫度和 60% 至 65% 的濕度下乾燥。
30 天后,從乾燥固化室中取出懸掛的 bresaola。稱重並使用“乾燥保存”部分前面提供的公式計算重量損失百分比。如果沒有達到目標重量損失百分比,讓 bresaola 繼續在乾燥固化室中乾燥。兩週後再檢查。
一旦 bresaola 達到目標減肥目標,將其整個真空包裝並在冰箱中存放 30 至 60 天。這將使任何可用的水分均勻並軟化在乾燥過程中可能會變硬的 bresaola 的外部。如果您沒有真空封口機,請將其用保鮮膜緊緊包裹並存放在 Ziploc 袋中。
吃的時候把布雷薩奧拉切成薄片。不要切片儲存,因為它會氧化並且嘗起來像平淡的肉。
如果您沒有乾固化室,您可以隨時嘗試將 bresaola 掛在地下室陰涼的地方。
改變它!嘗試不同數量的不同香料以獲得不同的結果。
釀葡萄葉是一個充滿希臘風味的菜餚,適合成為開胃菜或便餐,結合了米飯、香草和多種配料,營養美味。
地中海飲食中常見的鷹嘴豆和蠶豆,不僅美味,更是健康的飲食選擇。
這款巧克力肉桂醬非常適合搭配冰淇淋、蛋糕或布朗尼蛋糕,並且可以在冰箱中保存長達兩週。
奇亞籽當然是獨一無二的。它們營養豐富,對您的健康有益且富含 omega-3 脂肪酸。以下是一些關於奇亞籽的鮮為人知的事實,您可能會驚訝地發現。
豌豆湯是一種舒適的食物,能在寒冷的冬夜給您帶來溫暖與滿足。了解如何製作這種美味的湯, идеально配合鄉村白麵包或黑麥麵包。
了解 Instant Pot 的零件和功能,這將使您成為廚房的高手,快速準備美味的餐點。
將這種平腹綠豆薯條食譜添加到您的曲目中,它們將成為家庭的最愛,特別適合替代傳統薯條!
使用壓力鍋煮豆子是簡單而高效的方法。遵循這些建議的烹飪時間,以獲得完美的豆類。
探索基本的棕色醬汁製作技巧,其主要成分是牛肉或小牛肉的庫存,並了解如何用不同的方法增強其風味。
如果您採用低膽固醇的生活方式,則需要重新考慮您的食品購物習慣:了解哪些水果和蔬菜最有益,並尋找高纖維食物。此外,熟悉常見食物中的膽固醇和飽和脂肪含量,以便您自動做出最健康的選擇。

")